Search Results for: security policy

Open OnDemand (OOD/VDI) Remote Desktop: How to open software

Open OnDemand (OOD/VDI) Remote Desktop: How to open software

Introduction

In this document, you can see how to launch different software in the Open OnDemand (OOD) Remote Desktop app (available at rcood.rc.fas.harvard.edu)

Step 1: Connect to the FASRC VPN (see VPN setup documentation)

Step 2: Launch the Remote Desktop app

Step 3: When the Remote Desktop app opens, click the terminal icon to launch a terminal (or click Applications -> Terminal Emulator).

Step 4: Below, you can follow the instructions to launch various software.

Keep in mind that, for the most part, the terminal window must remain open. If the terminal window is closed, the software launched via the terminal will also be closed.

Training Session: FASRC Open On Demand Users Training

Remote Desktop login

To comply with Harvard’s security policy, if the Remote Desktop session becomes idle, the Remote Desktop session will lock. You need to enter your FASRC password to log back in.

Abaqus

In the terminal, type the commands to load the modules and launch Abaqus

[jharvard@holy7c24102 ~]$ module load abaqus
[jharvard@holy7c24102 ~]$ export LANG=en_US
[jharvard@holy7c24102 ~]$ abaqus cae -mesa cpus=$SLURM_CPUS_PER_TASK &

You can see all versions of Abaqus with module spider abaqus. For more details, see the modules page.

The Abaqus license is restricted to SEAS. For more information, see our Abaqus docs.

Comsol

In the terminal, type the commands to load the modules and launch Comsol

[jharvard@holy7c24102 ~]$ module load comsol
[jharvard@holy7c24102 ~]$ export OMP_NUM_THREADS=$SLURM_CPUS_PER_TASK
[jharvard@holy7c24102 ~]$ comsol -3drend sw -np $SLURM_CPUS_PER_TASK &

You can see all versions of Comsol with module spider comsol. For more details, see the modules page.

The Comsol license is restricted to SEAS. For more information, see our Comsol docs.

For how to set the Comsol temporary directory, see our Comsol Troubleshooting doc.

Jupyter Notebook

(optional) Creating and loading a mamba/conda environment

Note: this is a one-time setup to ensure that your conda environment can be loaded in Jupyter Notebook.

See our Python documentation on how to create a conda environment.

Then, in order to see your conda environment in Jupyter Notebook, ensure that you have installed the packages ipykernel and nb_conda_kernels. To do so, launch a terminal in the Remote Desktop and type the commands:

[jharvard@holy7c24102 ~]$ module load python
[jharvard@holy7c24102 ~]$ source activate my_conda_environment
[jharvard@holy7c24102 ~]$ mamba install ipykernel
[jharvard@holy7c24102 ~]$ mamba install nb_conda_kernels

For more information on creating conda environments for TensorFlow and PyTorch, see our GitHub documentation:

You can see all versions of Python with module spider python. For more details, see the modules page.

Launching Jupyter Notebook

In the Remote Desktop terminal, type the commands to load the modules and launch Jupyter Notebook:

[jharvard@holy7c24102 ~]$ module load python
# (optional) load conda environment
[jharvard@holy7c24102 ~]$ source activate my_conda_environment
# launch jupyter notebook
[jharvard@holy7c24102 ~]$ jupyter notebook

After the jupyter notebook command, it may hang for a few seconds. Be patient, a Firefox window will open soon after.

To select my_conda_environment as the kernel, go to Kernel -> Change kernel, and select the kernel (i.e. conda environment) of your choice.

Note: If you prefer to launch Jupyter Lab, note that conda environments cannot be loaded when using Jupyter Lab. Only the base environment is available.

Cleanly close Jupyter Notebook

These are instructions to kill your Jupyter server and so you can exit the job cleanly.

First, close each Jupyter Notebook you have open: click on File -> Close and Halt.

Then, from the Jupyter Notebook Home Page (where you can browse files and folders), on the top right corner, click on “Quit”. Close the Firefox window.

KNIME

In the terminal, type the following commands to load the module and launch Knime.

[jharvard@holy7c24102 ~]$ module load knime
[jharvard@holy7c24102 ~]$ knime &

You can see all versions of KNIME with module spider knime. For more details, see the modules page.

LibreOffice

LibreOffice is a free and open source suite that is compatible with a wide range of formats, including those from Microsoft Word (.doc, .docx), Excel (.xls, .xlsx), PowerPoint (.ppt, .pptx) and Publisher.

LibreOffice is available in the FASRC cluster (both Cannon and FASSE) through a Singularity image. Therefore, LibreOffice is only available through the Remote Desktop app.

To launch LibreOffice, in the terminal, run the command

[jharvard@holy7c24102 ~]$ singularity exec --cleanenv --env DISPLAY=$DISPLAY /n/singularity_images/OOD/libreoffice/libreoffice_latest.sif soffice

Lumerical

In the terminal, type the commands to load the modules and launch Lumerical

[jharvard@holy7c24102 ~]$ module load lumerical-seas
[jharvard@holy7c24102 ~]$ launcher

The Lumerical license is restricted to SEAS. For more information, see our Lumerical docs.

You can see all versions of Lumerical with module spider lumerical. For more details, see the modules page.

Mathematica

In the terminal, type the commands to load the modules and launch Mathematica

[jharvard@holy7c24102 ~]$ module load mathematica

# versions 15+
[jharvard@holy7c24102 ~]$ wolframnb

# versions 12 and 13
[jharvard@holy7c24102 ~]$ mathematica

You can see all versions of Mathematica with module spider mathematica. For more details, see the modules page.

Matlab

In the terminal, type the commands to load the modules and launch Matlab

[jharvard@holy7c24102 ~]$ module load matlab
[jharvard@holy7c24102 ~]$ matlab -desktop -softwareopengl

You can see all versions of Matlab with module spider matlab . For more details, see the modules page.

MOE

In the terminal, type the commands to load the modules and launch MOE

[jharvard@holy7c24102 ~]$ module load moe
[jharvard@holy7c24102 ~]$ moe

You can see all versions of MOE with module spider moe . For more details, see the modules page.

MOE databases

FASRC has MOE databases available in two locations:

  1. Most of the MOE Auxiliary Databases are available to everyone with cluster access in /n/holylabs/rc_admin/Everyone/moe_databases:
  2. Databases are also available in the $MOE/project folder. You can open them in File -> Open -> Type in the address bar $MOE/project.

RStudio Desktop

In the terminal, type the commands to load modules

[jharvard@holy7c24102 ~]$ module load R
[jharvard@holy7c24102 ~]$ module load rstudio

Set environmental variables

[jharvard@holy7c24102 ~]$ unset R_LIBS_SITE
[jharvard@holy7c24102 ~]$ mkdir -p $HOME/apps/R_version
[jharvard@holy7c24102 ~]$ export R_LIBS_USER=$HOME/apps/R_version:$R_LIBS_USER

Launch RStudio Desktop

[jharvard@holy7c24102 ~]$ rstudio

# vanilla option (combines --no-save, --no-restore, --no-site-file, --no-init-file and --no-environ)
[jharvard@holy7c24102 ~]$ rstudio --vanila

You can see all versions of R and RStudio with module spider R and module spider rstudio, respectively. For more details, see the modules page.

Remoteviz Partition

If you have used the “FAS-RC Remote Visualization” Open OnDemand (or VDI) app, we have decommissioned it.

SageMath

You can use sage wither in a interactive shell using command line interface or by launching a Jupyter Notebook with the SageMath kernel. To launch a Jupyter Notebook, in the terminal, type the commands to load the modules and launch Jupyter

[jharvard@holy7c24102 ~]$ module load sage
[jharvard@holy7c24102 ~]$ sage -n jupyter

Ensure that you have “SageMath” kernel selected. If not, go to Kernel -> Change kernel, and select SageMath.

For example, see Sage documentation:

You can see all versions of SageMath with module spider sage. For more details, see the modules page.

SAS

In the terminal, type the commands to load the modules and launch SAS

[jharvard@holy7c24102 ~]$ module load sas
[jharvard@holy7c24102 ~]$ sas &

Stata

In the terminal, type the commands to load the module and launch Stata

[jharvard@holy7c24102 ~]$ module load stata/17.0-fasrc01

# if you are using single-core jobs
[jharvard@holy7c24102 ~]$ xstata-se

# if you are using multi-core jobs
[jharvard@holy7c24102 ~]$ xstata-mp "set processors $SLURM_CPUS_PER_TASK"

TensorBoard

For TensorBoard, you will first need to create a conda environment (Step 1). You only need to create a conda environment once. If you have created one, you can skip to Step 2. Or, if you have your own environment, make sure you install the TensorBoard package, and then you can skip to Step 2.

Step 1: Create conda environment

In a terminal, load Mambaforge or Python module, create a mamba environment, activate it, and install TensorBoard inside the mamba environment

[jharvard@holy7c24102 ~]$ module load python
[jharvard@holy7c24102 ~]$ module load cuda/11.7.1-fasrc01
[jharvard@holy7c24102 ~]$ module load cudnn/8.5.0.96_cuda11-fasrc01
[jharvard@holy7c24102 ~]$ conda create -n tb_tf2.10_cuda11 python=3.10 pip numpy six wheel scipy pandas matplotlib seaborn h5py jupyterlab
[jharvard@holy7c24102 ~]$ source activate tb_tf2.10_cuda11
[jharvard@holy7c24102 ~]$ conda install -c conda-forge tensorboard
[jharvard@holy7c24102 ~]$ conda install -c conda-forge tensorflow

You can see different versions of Mambaforge or Python in our modules page.

Step 2: Activate conda environment and launch TensorBoard

In a terminal, setup variables for TensorBoard. Make sure that the data you need to visualize in Tensorboard is located in the log directory MY_TB_LOGDIR. You can either use the suggested path below or use somewhere else that better suits your workflow.

# Find available port to run server on (does not output anything to screen)
[jharvard@holy7c24102 ~]$ for myport in {6818..11845}; do ! nc -z localhost ${myport} && break; done

# setup tensorboard environmental variables
[jharvard@holy7c24102 ~]$ export MY_TB_PORT=${myport}
[jharvard@holy7c24102 ~]$ export MY_TB_BASEURL=/node/${host}/${myport}/
[jharvard@holy7c24102 ~]$ export MY_TB_LOGDIR=$HOME/.tensorboard/log/$SLURM_JOBID
[jharvard@holy7c24102 ~]$ mkdir -p $MY_TB_LOGDIR

# load module, activate conda environment, and launch tensorboard
[jharvard@holy7c24102 ~]$ module load python
[jharvard@holy7c24102 ~]$ module load cuda/11.7.1-fasrc01
[jharvard@holy7c24102 ~]$ module load cudnn/8.5.0.96_cuda11-fasrc01
[jharvard@holy7c24102 ~]$ source activate tb_tf2.10_cuda11 
(tb_tf2.10_cuda11) tensorboard --host localhost --port ${MY_TB_PORT} --logdir ${MY_TB_LOGDIR} --path_prefix ${MY_TB_BASEURL}

You can see different versions of Mambaforge or Python in our modules page.

Right-click on the link that starts with “http://localhost” and click on “Open Link”. This will open a Firefox browser, where you can view your results.

Example

Using the environment created in Step 1, run the small program tb_test.py in a directory of your choice and visualize its results.

Source code of tb_test.py:

import os
import tensorflow as tf
import datetime

def create_model():
    return tf.keras.models.Sequential([
        tf.keras.layers.Flatten(input_shape=(28, 28)),
        tf.keras.layers.Dense(512, activation='relu'),
        tf.keras.layers.Dropout(0.2),
        tf.keras.layers.Dense(10, activation='softmax')
    ])

mnist = tf.keras.datasets.mnist
(x_train, y_train),(x_test, y_test) = mnist.load_data()
x_train, x_test = x_train / 255.0, x_test / 255.0

model = create_model()
model.compile(optimizer='adam',
loss='sparse_categorical_crossentropy',
metrics=['accuracy'])

logdir = os.getenv('MY_TB_LOGDIR')
print(logdir)

tensorboard_callback = tf.keras.callbacks.TensorBoard(log_dir=logdir, histogram_freq=1)
model.fit(x=x_train, 
          y=y_train, 
          epochs=5, 
          validation_data=(x_test, y_test), 
          callbacks=[tensorboard_callback])

Setup variables and run tb_test.py

# Find available port to run server on (does not output anything to screen)
[jharvard@holy7c24102 tb_example]$ for myport in {6818..11845}; do ! nc -z localhost ${myport} && break; done

# go to the directory that you have your tb_test.py file
[jharvard@holy7c24102 ~]$ cd tb_example

# setup tensorboard environmental variables
[jharvard@holy7c24102 tb_example]$ export MY_TB_PORT=${myport}
[jharvard@holy7c24102 tb_example]$ export MY_TB_BASEURL=/node/${host}/${myport}/

# this command will set MY_TB_LOGDIR to your current working directory
[jharvard@holy7c24102 tb_example]$ export MY_TB_LOGDIR=$PWD

# load modules and activate conda environment
[jharvard@holy7c24102 tb_example]$ module load python
[jharvard@holy7c24102 tb_example]$ module load cuda/11.7.1-fasrc01
[jharvard@holy7c24102 tb_example]$ module load cudnn/8.5.0.96_cuda11-fasrc01
[jharvard@holy7c24102 tb_example]$ source activate tb_tf2.10_cuda11

# run python code
(tb_tf2.10_cuda11) python tb_test.py

# launch tensorboard
(tb_tf2.10_cuda11) tensorboard --host localhost --port ${MY_TB_PORT} --logdir ${MY_TB_LOGDIR} --path_prefix ${MY_TB_BASEURL}

Right click on the link that starts with “http://localhost” and click on “Open Link”. This will open a Firefox browser where you will be able to see your results.

TotalView

TotalView is a debugging tool particularly suitable for parallel applications. The modules you need to load depend on the compilers used in the code you are trying to debug. Due to this compiler dependency, we refer you to a more elaborate TotalView documentation.

Visual Studio Code

In the terminal, type the commands to load the modules and launch Visual Studio Code

[jharvard@holy7c24102 ~]$ module load vscode
[jharvard@holy7c24102 ~]$ code --user-data-dir $HOME/.vscode/data/ &

You can see all versions of Visual Studio Code with module spider vscode. For more details, see the modules page.
FASSE Cluster (FAS Secure Environment)

FASSE Cluster (FAS Secure Environment)

Overview

The FAS Secure Environment (FASSE) is a secure multi-tenant cluster environment to provide Harvard researchers access to a secure enclave for analysis of sensitive datasets with DUAs and IRBs classified as Level 3. All servers in the FASSE environment are physically located inside an access-controlled data center. We have implemented security controls and access control lists to restrict access.

Access to the cluster is restricted via a Virtual Private Network (VPN) and only authorized users/groups will be added to the FASSE VPN realm. If you do not belong to a FASSE project group, you cannot access the FASSE VPN or cluster.

We provide different storage tiers based on project needs. Please review storage options. 

Note: As this is a secure environment, your home folder on FASSE is separate from any home folder you might have on the FASRC (Cannon) cluster. Data from the secure level 3 (FASSE) environment should not be transferred into level 2 space (Cannon).

FASSE is not rated for Level 4/DSL 4 data. If you require a Level 4 environment, please contact University RC (URC) to discuss options.
FASRC does not provide a Level 4 secure environment.

See also:


STEP 0: HRDSP REQUIREMENTS

In order to have a FASSE DSL3 environment created for a project, the project owner or PI must first satisfy the HRDSP application requirements. FASRC (or the HRDSP section here) is required by the university to review any documents (DUA/DAT/IRB) before a new FASSE project is created and/or any data is copied to the cluster. This information will also help FASRC determine how the environment should be set up, who the contacts are, and how project group names should be constructed.

FASRC cannot advise you on this step, please contact VPR for assistance and guidance.

HRDSP: Harvard Research Data Security Policy site
HRDSP: Applications Summary and Order of Reviews

Please complete this process with OVPR before making any FASSE request or if you do not already know your data’s security requirements.
If you need assistance, please contact your school privsec officer.


Step 1: Sign up for a FASRC Account

If you do not already have a FASRC account (otherwise skip to Step 2):

PI/Project Owner

Users

Before you can access the FASSE cluster you need to request a Research Computing account, selecting your PI as your sponsor (in this case, this is a Harvard faculty PI [or in some cases, a non-faculty researcher with PI rights], not necessarily the person listed on an IRB or DUA). See How Do I Get a Research Computing Account for instructions if you do not yet have an account. If your Harvard PI does not exist, please direct them to this same page and the directions in the previous paragraph.

New Accounts

If you have an existing account or have already completed the following three steps, you can skip this section. But please note the FASSE VPN realm (@fasse) noted below. You must connect to this realm to access any FASSE resources.

Password Set

Once you have your FASRC account, you will receive an email with the same information as below, but step one is to set your password. This will be done using your email address and our password reset system.

See our Password Reset documentation for instructions.

OpenAuth (two-factor)

To access FASSE and most FASRC services, including the FASRC VPN, you will need your personal FASRC OpenAuth two-factor (2FA) token. This can be set up on your smartphone using an app or downloaded as a Java applet to run on your desktop/laptop.

See our OpenAuth documentation for setup instructions.

FASSE VPN

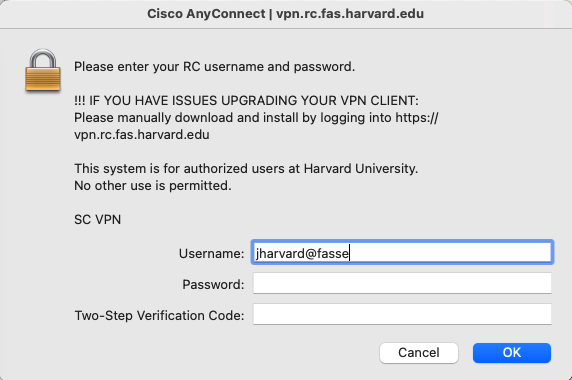
In order to access any secure system or environment in FASRC, you will need to connect to the FASRC VPN. The FASRC VPN is separate from other Harvard VPNs you may already be using.  To connect to a FASSE environment, you will connect to the FASRC VPN (vpn.rc.fas.harvard.edu) using the @fasse realm (ex. – jharvard@fasse), your FASRC password, and your OpenAuth 2FA code.Cisco Anyconnect window showing a username as jharvard@fasse

See our VPN documentation for setup instructions.


Step 2: Request a FASSE Project

If you have completed the HRDSP process and you and your PI have FASRC accounts, you can proceed to fill out the

FASSE New Project Request Form (Harvard Key login required)


USING FASSE

Accessing the FASSE environment.

FASSE VPN

To connect to a FASSE environment, you will connect to the FASRC VPN (vpn.rc.fas.harvard.edu) using the @fasse realm (ex. – jharvard@fasse), your FASRC password, and your OpenAuth 2FA code.  If you’re used to using Cannon, note that the VPN realm, @fasse, is different from the @fasrc realm you’re used to using.

SLURM and Partitions

To manage the workload on the cluster we use SLURM. Partition is the term that Slurm uses for queues. Partitions can be thought of as a set of resources and parameters around their use.  You can use spart to find out what partitions you have access to. Following are the partitions available on the FASSE cluster.

To run jobs on the main cluster instead, please refer to Running Jobs (Cannon)

PartitionNumber of NodesCores per NodeCPU Core TypesMem per Node (GB)Time LimitMax JobsMax CoresMPI Suitable?GPU Capable?/scratch size (GB)
fasse4248Intel "Cascade Lake"1767 daysnonenoneyesNo68
fasse_bigmem1864Intel "Ice Lake"4997 daysnonenoneyesNo172
fasse_ultramem164Intel "Ice Lake"20007 daysnonenonenoNo396
fasse_gpu264Intel "Ice Lake"4877 daysnonenoneyesYes (4 A100/node)172
fasse_gpu_h2002112Intel "Sapphire Rapids"9903 daysnonenoneyesYes (4 H200/node)843
test548Intel "Cascade Lake"17612 hours596 coresyesNo68
serial_requeuevariesvariesIntelvaries7 daysnonenoneNoYesvaries
PI/Lab nodesvariesvariesvariesvariesnonenonenonevariesvariesvaries

Do not use salloc

Do not use salloc on FASSE.  Salloc is not available on FASSE for security reasons.  For interactive access, please use the FASSE VDI (see below).

Open OnDemand (OOD) Access

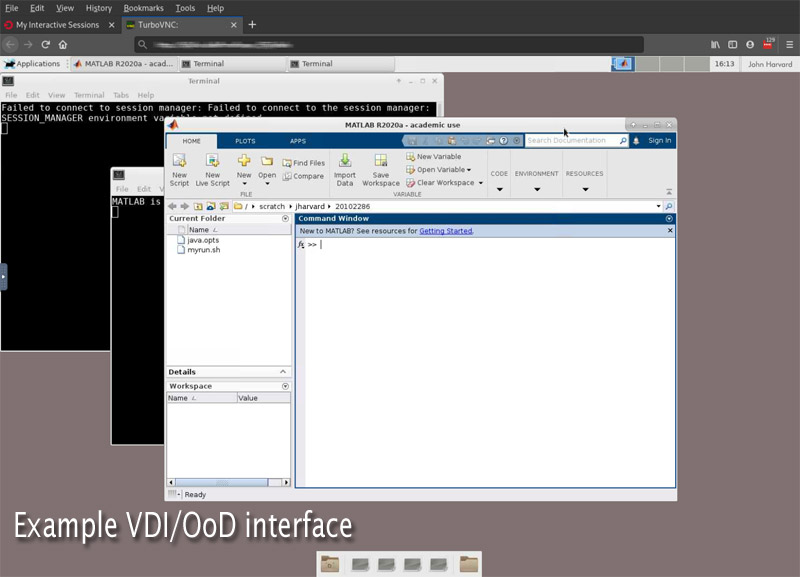
OpenOnDemand (OOD) or VDI (virtual desktop interface) is a virtual GUI interface that provides everything from pre-built apps to interactive command line access within a familiar desktop-like environment.

The FASSE OOD is available when connected to our @fasse VPN realm, through your web browser.  Please visit to access the service: https://fasseood.rc.fas.harvard.edu

See the following documentation for further information on how to leverage OOD on FASRC clusters:

  1. OOD Dashboard and Remote Desktop
  2. R and RStudio Server
  3. OOD Remote Desktop and Software

Command Line Access

Command-line access is also available for those who need/want to run jobs using a CLI. Login nodes for FASSE can be accessed by SSH at fasselogin.rc.fas.harvard.edu:

ssh jharvard@fasselogin.rc.fas.harvard.edu

Note that FASSE does not allow running interactive jobs via salloc. Instead, you have to use OOD to run interactive jobs.

For general information on using CLI on the cluster, see Command Line Access with Terminal


FASSE FAQ

Please see STEP 0: HRDSP REQUIREMENTS at the top of this page. You must complete the Harvard HRDSP requirements before proceeding. If you do not have a FASRC account yet, you should also see: Account Signup

Level 3 and other sensitive files and data stored within the secure environment should never be transferred to storage on the FASRC main cluster or to outside storage which is not designed and approved to house secure data.

FASSE secure storage shares should be accessible via Globus to allow you to transfer your data.

Local Scratch on FASSE Nodes
Jobs on FASSE nodes have local scratch space at /scratch. Data in this space is only retained for the length of the job, as such data that needs to be retained should be saved to long term storage.

Global Scratch
Global scratch is available at /n/netscratch or using the $SCRATCH variable.

FASSE global scratch has the same 90-day retention policy. For policy details and more on the scratch variable, see: Scratch Policy

Each user has a home directory that is accessible only when logged into the secure FASSE environment. This home directory cannot be accessed on the main cluster. While you can also log into the main FASRC cluster, your FASSE home directory and project storage will not be accessible there as the main cluster is only rated for level 2 or lower data.
Users of the FASSE secure cluster can also log into the main FASRC cluster. This may be necessary for some users who also work with level 2 jobs or data with their lab on the main cluster. But bear in mind that these are two separate environments and data from FASSE cannot be transferred onto the level 2 FASRC Cannon cluster.

When logging into FASSE you will have a home directory that resides only on FASSE. When logging into the main cluster, you will find a different home directory. So bear this in mind if you do switch between the two.
Your lab directory on FASSE is accessible only when logged into the secure FASSE environment. Your lab directory cannot be accessed on the main cluster. While you can also log into the main FASRC cluster, your FASSE lab directory/project storage will not be accessible there as the main cluster is only rated for level 2 or lower data.

FASSE is a secure environment and, as such, does not allow direct access to the Internet.

Accessing the internet while connected to the FASSE VPN realm (@fasse) and from FASSE nodes must be done through a network proxy.

This should be a global environment variable which is picked up by modern browsers, but some applications, including some command-line tools will require you to manually provide the proxy settings before they will be able to access the Internet.

NOTE: Our proxy does not allow all traffic, but should allow access to most things necessary for your work.

Command Line/Terminal
To manually set the proxy in your terminal environment, enter the following:
export http_proxy=http://rcproxy.rc.fas.harvard.edu:3128
export https_proxy=http://rcproxy.rc.fas.harvard.edu:3128

You can add these lines to your .bashrc if you find yourself needing to set this regularly.


Web Browsers
For web browsing, your browser should work if set to ‘Use system proxy settings’ / 'Auto-detect proxy’ (language may vary by browser). If this does not work automatically, you may need to manually add the proxies to your browser. You will need to disable this when not on the VPN.

HTTP Proxy: http://rcproxy.rc.fas.harvard.edu
Port: 3128

HTTPS Proxy: https://rcproxy.rc.fas.harvard.edu
Port: 3128

Data and Data Use Agreements (DUA)

Data and Data Use Agreements (DUA)

Preface

Before any data which is considered confidential, proprietary, or otherwise considered sensitive can be stored on the FASRC cluster, it must be properly classified and any data use agreements must be in place and available.

The project PI is responsible for ensuring that any future approved access is compliant with any DUA or data use other agreement, including updating the data provider before approving access, if required.

Human or Animal Data

If you are collecting or using data from humans or animals, you should contact Harvard’s Institutional Review Board (IRB) and/or Institutional Animal Care and Use Committee (IACUC) first.

Any data of this type which does not have an IRB determination cannot be transferred to the FASRC cluster until that process is complete. 

  • LEVEL 3/DSL3: Please note that only the FASRC FASSE Secure environment is rated for Level 3/DSL3. The main cluster is rated only for Level 2 or below.
  • LEVEL 4/DSL4: If you require a Level 4 environment, you can contact FASRC to discuss your project, but please be aware that FASRC does not currently provide a Level 4 secure environment. The FASRC cluster, including FASSE, is not suitable for DSL4 projects.
Where to start:

See also:

Data Use Agreements (DUA)

Many data sets require a Data Use Agreement which must be on file at Harvard and adhere to the requirements and duration of that agreement. This should be completed prior to transferring any such data to the FASRC cluster.

To submit, manage, and review DUA requests, you will use Harvard’s DUA Agreements System

Where to start:
HRDSPHarvard Research Data Security Policy site
HRDSPApplications Summary and Order of Reviews

Confidential Data

Confidential Data

We would like to bring your attention to how Harvard University classifies different types of confidential data and how they should be stored.

Storage Modernization Initiative: Frequently Asked Questions (FAQs)

Storage Modernization Initiative: Frequently Asked Questions (FAQs)

What is the difference between the new Compute Storage and Lab Storage?

Compute Storage is designed as an active storage location for data analysis, with data being readily accessed and utilized. It is a highly performant, cluster adjacent storage, optimized for high throughput data access, including AI and ML. Lab Storage is a general-purpose storage for hosting raw and project data. It is not intended for heavy computational workflows but can be used as a buffer storage for lab instruments. Some lab groups may decide to utilize multiple storage offerings, including both Compute Storage and Lab Storage. A full listing of the features on Compute Storage and Lab Storage including associated costs, backups, and security levels, is available on our Data Workflows webpage.

My data currently resides on FASSE. What is happening to it?

All data currently residing in a FASSE storage folder will be moving to our new FASSE storage. Information about the new features, costs, and security level is provided on our Data Workflows webpage:

https://docs.rc.fas.harvard.edu/kb/data-storage-workflow-rdm/

Where will my data be moving? When will it be moved?

The full Storage Transition schedule is available on our Storage Modernization Initiative webpage:

https://www.rc.fas.harvard.edu/services/data-storage

Specific timelines and dates will be communicated directly to affected labs prior to the migration.

Netscratch, holylabs, and home folders will not be affected by this migration.

Who in my lab will receive the emails about upcoming storage migration efforts?

All active group members will receive email communications about upcoming storage migrations. PIs can review the list of group members in the Coldfront Allocation dashboard.

To log in to Coldfront, please use your FAS RC username and password:

https://docs.rc.fas.harvard.edu/kb/coldfront-allocation-management/

If you have difficulties with your password, you can reset it:

https://docs.rc.fas.harvard.edu/kb/reset-password/

We recommend accessing the Coldfront dashboard while connected to the FAS RC VPN:

https://docs.rc.fas.harvard.edu/kb/vpn-setup/

What are the new features of Compute Storage? Does it have backups?

The full list of features for Compute Storage is available on the Data Workflows webpage:

https://docs.rc.fas.harvard.edu/kb/data-storage-workflow-rdm/

Compute Storage comes with weekly snapshots every two weeks. No disaster recovery option is provided.

It is important to have a post-processing plan for Compute Storage, including the option to move post-processed data to a location with disaster recovery, if needed:

https://docs.rc.fas.harvard.edu/kb/data-storage-workflow-rdm/

What are the new features of Lab Storage? Does it have backups?

The full list of features for Lab Storage is available on the Data Workflows webpage:

https://docs.rc.fas.harvard.edu/kb/data-storage-workflow-rdm/

Lab Storage will include daily backups for seven days and weekly backups for four weeks.

How do I access my new storage folder on Lab Storage?

On the cluster via terminal or OpenOnDemand the path is
/n/lab_storage/pi_lab

To access your data via mapped network drive, the path is
\\lab-storage-smb.rc.fas.harvard.edu\pi_lab (windows)
smb://lab-storage-smb.rc.fas.harvard.edu/pi_lab (mac)

On Globus in the “Harvard FAS RC Boston” collection, the path is
/n/lab_storage/pi_lab

All paths not containing ‘lab_storage’ or ‘lab-storage-smb’ are to be distrusted. If, somehow, paths with ‘net’, ‘fs’, ‘isilon’, ‘/n/pi_lab’ or anything else do work, you will find that they are read-only. You will be seeing old data from before the move and will not be able to write new data. Therefore, you should switch scripts and habits to use lab_storage immediately because other paths will eventually go away (maybe soon).

You can follow the steps in the Getting Started with FAS RC Storage documentation to locate your lab folder:

https://docs.rc.fas.harvard.edu/kb/getting-started-with-fasrc-storage/

I received an email about the upcoming storage migration, but I’m no longer associated with that lab. Can I be removed?

Please email rchelp@rc.fas.harvard.edu to request removal from a lab group.

We want our data to be moved somewhere else, rather than to Lab Storage.
How do we do that?

Please email rdm@rc.fas.harvard.edu to discuss migrating the data to another storage offering.

We no longer use this storage folder; can we delete the data or move it to Tape?

1. PIs should review their data storage using the Coldfront Allocation Dashboard and the Starfish Data Visualization tool to confirm that the data can be removed.

Coldfront Allocation Dashboard:
https://docs.rc.fas.harvard.edu/kb/coldfront-allocation-management/

Starfish Data Visualization tool:
https://docs.rc.fas.harvard.edu/kb/starfish-data-management/

Please review Harvard’s Data Retention FAQs to ensure compliance with the university’s data-retention policy. Please also consider any applicable IRB requirements.

Harvard’s Data Retention FAQs:
https://research.harvard.edu/files/2022/10/research_records_and_data_retention_and_maintenance_guidance_rev_2017.pdf

2. If the data can be deleted, the lab can delete the data and then request that the storage allocation be decommissioned through the Coldfront Allocation Dashboard:

https://docs.rc.fas.harvard.edu/kb/coldfront-allocation-management/

If you have difficulty deleting the data, please email rdm@rc.fas.harvard.edu. They will work with you to delete the data. Please provide the exact directory path to ensure that the correct data is deleted.

3. If you would like to migrate the data to Tape, request a new Tape storage allocation using the Coldfront Allocation Dashboard:

https://docs.rc.fas.harvard.edu/kb/coldfront-allocation-management/

A member of FAS RC will contact you once the Tape allocation is ready to use.

4. You can migrate data to Tape using Globus:

https://docs.rc.fas.harvard.edu/kb/tape-globus-access/

You may need to tar the dataset before moving it to Tape.

Tape has restrictions on how many files can be moved per directory. We have recommendations for tarring data in preparation for Tape:

https://docs.rc.fas.harvard.edu/kb/tips-for-tar-archiving/

Do I need to do anything to migrate the data? How will the migration process work?

FAS RC will migrate existing folders on each designated storage system to the new Lab Storage.

Before the cutover date, the data in your lab folder will be marked read-only. Once FAS RC has completed the migration, you will receive an email with the new folder path.

The older version on the previous storage system will then be decommissioned.

What will change with my workflow with this migration? Will I have a different folder path? Will the permissions be the same?

Folder paths for all groups will change. You may need to update your existing scripts or documentation to reflect this change.

Two subdirectories will be present by default within the folder:

Lab:
This directory is intended as the primary working directory. It is also the directory shared through Globus:

https://docs.rc.fas.harvard.edu/kb/globus-file-transfer/

By default, folders in this subdirectory are visible to the entire lab. Individual users may update their permissions to adjust access as needed. However, we highly recommend keeping access open to all lab members to allow for easier collaboration and data cleanup after you leave the university.

Everyone:
This directory is visible to anyone on the HPC cluster and is intended for collaboration with other labs on the cluster.

Data in this directory is owned by the lab that hosts it by default. This directory is not available through Globus and is intended only for internal sharing.

Directory structures may differ depending on when they were created. Some older storage folders may have a third subdirectory called Users.

Use of this folder has been deprecated due to issues related to data access:

https://docs.rc.fas.harvard.edu/kb/data-ownership-and-access-policy/

Will this impact my other storage on /n/holylabs or /n/netscratch?

Netscratch, holylabs, and home folders will not be affected by the data migrations. They will remain in their current locations.

No data from these file systems will be migrated.

I need to request more storage on Lab Storage following the migration. How do I do this?

1. To request a new storage allocation or modify an existing storage allocation, log in to the Coldfront Allocation Dashboard:

https://docs.rc.fas.harvard.edu/kb/coldfront-allocation-management/

Use your FAS RC username and password. If you have difficulties with your password, you can reset it:

https://docs.rc.fas.harvard.edu/kb/reset-password/

You may also need to clear your web browser’s cache.

If requesting a new storage allocation, indicate which storage offering you would like to acquire and provide the associated 33-digit billing code.

If you do not have a FAS RC account, request one before logging in to Coldfront:

https://docs.rc.fas.harvard.edu/kb/how-do-i-get-a-research-computing-account/

2. PIs, General Managers, and Storage Managers can request new allocations or make changes to existing allocations:

https://docs.rc.fas.harvard.edu/kb/roles-responsibilities/

PIs can assign a General Manager or Storage Manager role to their lab through Coldfront. This allows the lab member to add or modify storage allocations.

How much does Lab Storage cost? How does it compare to my previous storage?

– Lab Storage costs $125 per TiB per year, billed monthly.
– For example, if you have a 20 TiB storage allocation, the cost will be:

($125 x 20 TiB) / 12 = approximately $208 per month

– Billing is based on the total allocation size, not on usage.

How can I update my current scripts so they point to Lab Storage?

You can use a variable for pathnames in your scripts.

For example, set lab_storage to the appropriate path, then change hard-coded paths to:

$lab_storage/Lab/data

To find which scripts contain hard-coded paths, use the grep command recursively in a directory.

For example, in your home directory, you might use:

grep -R “isilon” /n/home00/jharvard

Or:

grep -R “isilon” [your new lab path]/Lab/jharvard

Can I mount Lab Storage and Compute Storage via Samba?

Lab Storage will be available through SMB.

Compute Storage will not be available through SMB.

For instructions on mounting Lab Storage, see the Mounting Storage documentation:

https://docs.rc.fas.harvard.edu/kb/mounting-storage/

Will ACLs or fACLs carry over to the new storage?

No. Unix-style fACLs cannot be moved to the new storage.

If you require specific control over subdirectories, please contact FAS RC for help creating a group to manage access.

Very granular permissions—such as including one person while excluding another—will not be possible.

I can’t access a file that existed prior to the migration

It’s possible that the file was soft-linked, or symlinked, to another location. Open the folder in a terminal and view a long listing using:

ls -l

You’ll see something that looks like:

lrwxrwx—. 1 jharvard mcfee_lab 36 Aug 22 2024 myfile -> /n/mcfee_lab/Lab/scripts/myfile

This confirms that the file was soft-linked to another location. You’ll need to update the link to point to /n/lab_storage/… or use a relative path instead.

Is Lab Storage available on Globus for file transfers?

Lab Storage is available through the Harvard FAS RC Boston collection in Globus.

This may be different if you previously used Harvard FAS RC Holyoke.

Be sure to use the /n/lab_storage/pi_lab path. The direct links, like /n/pi_lab, will be removed soon.

For more information about file transfers using Globus, see:

https://docs.rc.fas.harvard.edu/kb/globus-file-transfer/

I have additional questions about my storage. Who should I contact and how do I get in touch with them?

Please email rdm@rc.fas.harvard.edu if you have additional questions about the Storage Modernization Initiative or future storage migrations.

FASRC AI Facilitation

FASRC AI Facilitation

FASRC Policy and Safety Guidelines for AI Workflows

FASRC allows the use of AI tools on the Cannon and FASSE FASRC clusters. Our users are free to install AI tools they need to execute their AI-based workflow under their cluster profile and provide it with data. However, we urge our users to be aware of the guidelines that the University has put forward for the use of such tools at Harvard. We do ask that for all HUIT-supported LLMs, our users register apps and access API keys that are under Harvard agreement prior to accessing those LLMs on the cluster.  

Additionally, if you are using AI agents for your work, you need to know how to use them responsibly on the cluster without compromising your data security or your user profile on the cluster. The AI Agents on the FASRC Clusters policy page walks you through the main points you need to be aware of in order to use AI agents responsibly on the cluster while maintaining the data integrity and data privacy of your work.

Note: Sometimes Chrome does not work for HUIT websites, especially if you are *not* on the University VPN. In that case, you can access those websites using Firefox.

Best Practices for AI workflows on FASRC Clusters

In order to execute an AI/ML workflow successfully on the cluster, it is important to understand:

  • How to safely install and launch a tool/software on the cluster that’s needed for your workflow
  • How to request resources for it properly
  • What are some of the pitfalls to be mindful of

This section provides a landing area for all the relevant documentation that will help you implement your AI/ML workflow on the cluster correctly. Before executing your AI workflow on the FASRC clusters, make sure to follow the safety guidelines mentioned above, and FASRC guidelines for launching an AI tool such as OpenAI’s ChatGPT.

How to install and utilize AI/ML tools or platforms? 

To successfully execute your AI/ML workflow on the cluster, you may need a variety of tools or platforms. The list below captures various tools and platforms that are currently available on FASRC clusters. Based on your needs, you can go through the relevant documentation to get guidance on how to install and execute these tools on the cluster, or utilize these platforms for your work.

* Anthropic

* HeavyAI

* Knime

* OpenAI

* Python Package Installation

* PyTorch

* Tensorflow

* VSCode

* Cursor

* AI Extensions

How to request resources for AI workflows?

This will typically require you to request GPUs and utilize them efficiently. GPU Computing on FASRC Clusters walks you through:

  • The resource allocation process for GPUs for a batch and an interactive job,
  • How to load and work with CUDA modules,
  • Example codes for GPU computing on the cluster
  • How to monitor your job’s performance on a GPU node.

In addition to that, one must be mindful of their job’s efficiency. A detailed description of what it means to run a job efficiently on the cluster is provided on Job Efficiency and Optimization Best Practices.    

Lookout For:

In addition to following the best practices mentioned above, one must be aware of some of the pitfalls associated with executing AI workflows on the cluster. For example:

  1. Are you using an AI tool or an extension via a code editor, such as VSCode or Cursor, on the login node?
  2. Have you inadvertently given permission to the AI tool to delete files or folders?
  3. Are you aware of prompt injection attacks while using an LLM-based application?
  4. What steps have you taken to secure your data against data leakage?
  5. Are you aware of your data security level?

Training

We regularly hold training sessions to support AI-based workflows on the cluster.  Please refer to our Training Calendar for upcoming sessions, and Training Material to access AI/ML computing documentation and presentation slide decks &/or video recordings of our previous training sessions.

Data Storage (Offerings, Workflow, Costs)

Data Storage (Offerings, Workflow, Costs)

FAS Research Computing (FAS RC) is transitioning to a new storage infrastructure, incorporating over 70 pebibytes of new data storage. This will ensure FAS RC remains at the forefront of research, with an innovative, scalable, and reliable data storage environment that will meet the evolving needs of the Harvard community.  

The transition consolidates and modernizes a significant portion of existing storage filesystems by migrating research data to new and improved hardware. 

Benefits: 

  • Enhanced support for computationally heavy workflows including AI and Machine Learning (ML)
  • Improved researcher experience with greater visualizations and storage tracking capabilities including data lifecycle management
  • Streamlined and consolidated storage environments reducing the need for migrations and complex data workflows 
  • More resilient and reliable hardware decreasing the potential for security risks and vulnerabilities
  • Built-in storage backups and encryption to prevent data loss 
  • Greater technological efficiency, reducing operational costs while allowing for long-term growth and scalability

Improvements:

  • Scalable, cost-effective storage designed to support researcher demands and lifecycle trends
  • Improved service quality with resilient infrastructure, providing reliable enterprise-grade support for a better user experience
  • Reduced manual overhead on data migration efforts, reallocating staff resources to strategic initiatives
  • Provides a predictable long-term cost recovery model with transparent pricing
  • Supports future initiatives including AI/ML workflows, secure multi-protocol access, and ever evolving scientific workflows

Identification of an appropriate storage location for your research data is a critical step in the research data lifecycle, as it ensures research data remains usable. We recommend you review the available storage options and select the preferred storage offering for your group’s intended workflow, keeping in mind how often the data will be consistently utilized and accessed. The offerings below are designed to store research data, rather than administrative data.

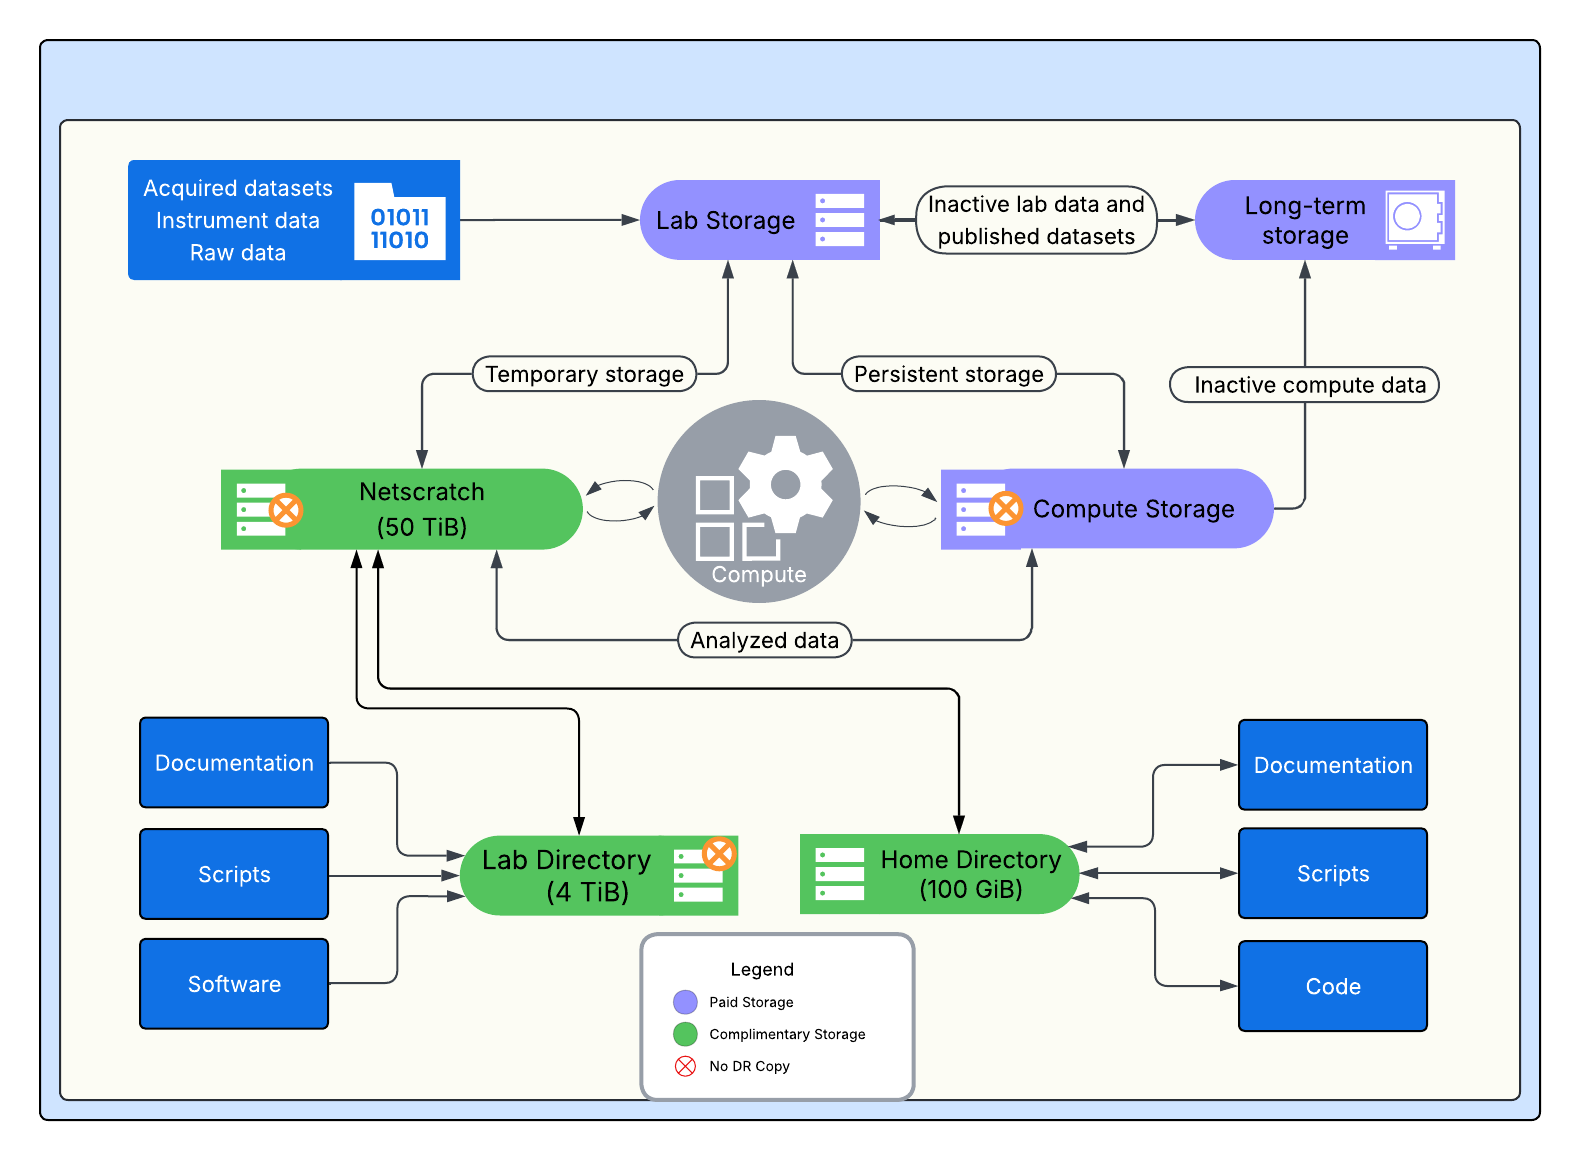
Each FASRC account is provided with a 100GiB Home Directory for individual use. Each PI or Lab Account also receives a 4TiB Lab Directory, for use by all members of the PI’s lab group and a 50TiB allotment of scratch (networked scratch). See the matrix below for more details.

*Snapshots are copies of a directory taken at a specific moment in time. They offer labs a self-service recovery option for overwritten or deleted files within the specific time period. Disaster recovery is a copy of an entire file system that can be used internally by FASRC in case of system-wide failure.

Storage Offerings (Paid)

Compute StorageLab StorageLong-term StorageTape (NESE)FASSE
DescriptionActive storage for data analysis; data readily utilized and accessed. Highly performant cluster adjacent storage. Optimized for AI/ML workflows.General purpose storage for raw and project data. Not intended for heavy computational workflows. Can be used as buffer storage for lab instruments.Long-term storage of research data to meet institutional data retention and compliance requirements. On-premise long-term storage option for Harvard affiliated labs.Long-term storage of inactive research data after project completion or data retention purposes. Externally managed by Northeast Storage Exchange (NESE).Secure storage environment for analysis or sensitive data, such as data generated using Data Use Agreements (DUAs) or IRB
PerformanceHighModerateLowNoneModerate
SizeAvailable upon requestAvailable upon requestAvailable upon request20TB increments. Ten thousand files per folder. File sizes between 1GiB to 100 GiB.Available upon request
Folder Path/n/compute_storage/pi_lab/n/lab_storage/pi_lab/n/long_term/pi_labTransfer data to Tape using Globus/n/fasse/pi_lab_projectname_l3
RetentionWeekly snapshots for 2 weeks. No disaster recovery.Daily snapshots weekly. Weekly snapshots every 4 weeks. Includes disaster recovery.No snapshots. Disaster recovery at additional cost.**No snapshots. No disaster recovery.Daily snapshots weekly. Weekly snapshots every 4 weeks. Includes disaster recovery. Encryption at rest included.
Cost$150/yr per TiB$125/yr per TiB$30/yr per TiB$15/yr per TB$150/yr per TiB
Security LevelLevel 2Level 2Level 2 (Up to Level 3)**Level 2Up to Level 3
StorageRequest storage allocationRequest storage allocationRequest storage allocationRequest storage allocationRequest storage allocation

Requesting Storage

To request a new storage allocation, or to modify an existing storage allocation, please login to the Coldfront Allocation Dashboard. To login to Coldfront, please use your FASRC username and password. If you have difficulties with your password, you can reset it. You may also need to clear the cache on your website browser. If requesting a new storage allocation, you will need to indicate which storage offering you would like to acquire and the associated 33-digit billing code. If you do not have a FASRC Account, you will need to request one before logging into Coldfront.

PIs, General Managers, and Storage Managers are able to request new allocations, or make changes to existing allocations. PIs can assign a General Manager or Storage Manager role to their lab using Coldfront; this will allow the lab member to add and/or modify storage allocations.

NOTE: All Lab Storage allocation requests can now be fulfilled. Compute Storage Allocation requests will continue to be stored on Tier 0 until the Compute Storage environment is available later this Summer. For more information about the timeline of the Storage Modernization Initiative, please visit the Data Storage website.

** Long-term Storage is a new offering for FAS RC. As such, we are still investigating additional features including the option to offer Disaster Recovery for a cost and increase the security level to Level 3. Further information will be provided to the community regarding disaster recovery cost and higher security levels later this year.

Storage Offerings (Complimentary*)

Home DirectoryLab Directorynetscratch
DescriptionPersonal user storage. Not recommended for computational purposes.General lab storage. Install software to be referenced from netscratch.Temporary storage location for high performance data analysis.
PerformanceModerateModerateHigh
Size100GiB (fixed)4TiB (fixed)50TiB (fixed)
Mount/n/homeNN/username/n/holylabs/n/netscratch
RetentionDaily snapshots weekly. Weekly snapshots every 4 weeks. Disaster recovery.No snapshots. No disaster recovery.No snapshots. No disaster recovery.
90-day retention policy.
CostNoneNoneNone
Security LevelUp to Level 2Up to Level 2Up to Level 2
StorageFolder generated for each user when granted cluster access. Limited to 100GiB.Folder generated for each approved PI and their group. Limited to 4TiB.Accessible to group members.

*Harvard-sponsored

Data Storage Workflow

Default Directory Structure

Two subdirectories will be present by default within the parent directory to enable easier Globus transfers and provide some initial guidance for how to organize storage.

Lab: This directory is intended as the primary working directory. It is also the directory shared out via Globus. By default, folders in this subdirectory are visible to the whole lab. Individual users may update their permissions to adjust access as they like though we highly recommend keeping access open to all lab members to allow for easier collaboration and data cleanup after you leave the university.

Everyone: This directory is visible to any one on the HPC cluster and is intended for collaboration with other labs on the cluster. Data in this directory is by default owned by the lab who hosts the data. Note that this directory is not available on Globus and is intended only for internal sharing.

While this is the default structure, labs may request additional folders be set up. Please email rchelp@rc.fas.harvard.edu if you have questions.

Directory structures on the cluster may differ depending on when they were created. Some older storage folders may have a third subdirectory called Users. We have deprecated use of this folder due to issues related to data access by the lab and PI’s, especially after users have left the university. If you are migrating data from a storage system that has a Users subdirectory we recommend moving that data into the Lab directory and making it available to the lab to view and access.

Contact:

If you have questions regarding the data storage options at FASRC, please email the Research Data Manager at rdm@rc.fas.harvard.edu.

Offboarding Policies and Procedures

Offboarding Policies and Procedures

This document outlines FAS Research Computing’s policies and procedures related to the offboarding of researchers and PIs. The document is structured as a checklist, to be utilized by researchers and PIs prior to their departure, to ensure a seamless transition. The document also notates differences between the offboarding of researchers and faculty (PIs).  

Offboarding Checklist: Leaving Harvard University

Researchers:

  1. General: 

    1. Inform FASRC via email prior to leaving the university, and provide us with an estimated departure date. 
  2. Storage: 

    1. Please review all research data prior to your departure (FAS Storage, Google Drive, Dropbox etc.). Confirm with your PI and department what data can be deleted or moved to long-term storage. 
      1. Review and receive approval from your PI what data can be removed. 
        1. Delete any data approved by your PI. 
        2. Please ensure a record of what data was deleted is available to your PI, if needed.
        3. For protected data (Level 3), PIs are responsible for informing FAS RC if and when the data requires disposal. Please email FAS RC to discuss destruction options.
      2. If research data stored on FASRC storage is ready to be moved to long-term storage, work with FASRC’s Research Data Manager and your PI to migrate the data. 
        1. An FASRC account is required to access FASRC storage; please ensure you have an account prior to moving data via rclone or Globus
      3. Ensure your research data is available to your PI and other collaborators, moving all research data to a shared storage location prior to your departure. Please ensure a record of what data was migrated is available to your PI, if needed.
      4. If you would like to take data with you following your departure from the university, you will need approval from your PI and department. Research data generated at the university is owned and maintained by the university. 
  3. Accounts 

    1. We will be closing your FASRC account when your appointment ends and your Harvard email account is closed. 
    2. If you need to maintain a FASRC account, please have your PI or authorized lab member (general manager or access manager) email us directly, prior to your departure, so we can convert the account to an external account. We will also need an external email address for the account, as your Harvard email will be disabled automatically. 
    3. Disabling the account will automatically remove you from associated groups, including secure groups (FASSE), administrative groups, and project groups. 

Faculty/PIs:

  1. General: 

    1. Inform FASRC via email when you will be leaving the university. 
    2. Please inform FASRC if you will be returning or compensating FASRC for any physical resources (compute notes and storage servers).  
    3. Please ensure you review the FAS Employee Exit Checklist; the document highlights other offboarding responsibilities for faculty leaving Harvard.
  2. Software: 

    1. All purchased software will remain on the cluster. Please delegate the software license responsibility to another entity (lab or department) or inform FASRC when the license will expire. 
  3. Storage: 

    1. Please review all research data prior to your departure. Confirm what data can be deleted or moved to long-term storage.
      1. Please review Harvard’s Data Retention FAQs, to ensure you are in compliance with the university’s policy around data retention.
      2. Collaborate with FASRC’s Research Data Manager to migrate remaining data to long-term storage. 
    2. If you would like to take research data with you following your departure from the university, ownership of the original data may be transferred from Harvard to your new institution upon request. The University asserts ownership over research data for all projects conducted at the University, under the auspices of the University, or with University resources.
      1. Requirements:
        1. Prior written approval from the Vice Provost for Research;
        2. A written agreement from your new institution that guarantees its acceptance of ongoing custodial responsibilities for the data and allowing Harvard access to the original data, should such access become necessary for any reason;
        3. Relevant confidentiality restrictions, where appropriate.
  4. Accounts 

    1. Inform FASRC via email when you will be leaving the university so they can disable your account. Your FASRC account will be closed when your appointment ends and your Harvard email account is closed. If you attain a different appointment at Harvard after your primary appointment ends, please notify FASRC as soon as possible.
    2. All lab members will need a new sponsor for their accounts. Please inform FASRC who the new sponsor will be for any remaining lab members. 
    3. Disabling your account will automatically remove you from associated groups, including secure groups (FASSE),  administrative groups, and project groups. 
  5. Virtual Machines 

    1. Remove any data you would like to retain from virtual machines prior to your departure; please inform FASRC once the data has been removed 
    2. Virtual Machines will be decommissioned shortly after your departure, once it is no longer aligned with an active account.

Offboarding Checklist: Changing Labs/Groups

Researchers:

  1. Request to be added to the new group using Portal. Your PI can also utilize Coldfront to add users to their group. 
  2. Review your research data to determine what data will need to remain in your previous lab folder(s) and what data needs to be migrated to your new lab folder
    1. Discuss the data migration with your former PI and get approval for the move.
    2. If you plan to continue to store research data in your previous lab folder, confirm this with your former PI, as there will be associated storage costs. 
    3. Delete any research data that will not be useful to either lab. Confirm with your former PI what data can be removed.
    4. Ensure your research data is available to your former PI and other collaborators, moving your research data to a shared storage location prior to your departure. Please ensure a record of what data was migrated is available, if needed.
    5. Review data in your group’s Scratch environment, as the data will be removed.
  3. Your new PI must inform FASRC via email that they will be sponsoring your account, so they can be assigned as your primary group. Provide the date of transition. 
  4. FASRC will then modify your FASRC account information.
    1. Add you to the new lab group/department
    2. Add your new PI as your manager
    3. Modify your Slurm group to be associated with the new lab
    4. Remove you from your previous lab and Slurm group. 
      1. If you require access to your previous lab, your former PI can re-add you to their group using the Coldfront application. 
  5. Storage
    1. Home directory data will always remain with the user account. The data will not need to be transferred. 

Additional information:

  1. Harvard Human Resources Offboarding Information 
  2. Harvard IT Offboarding Information 

Contact:

If you have questions regarding the offboarding process, please email the FAS Research Data Manager at rdm@rc.fas.harvard.edu.

SEAS Compute Resources

SEAS Compute Resources

The Harvard John A. Paulson School of Engineering and Applied Sciences (SEAS) has a number of compute resources managed by FAS Research Computing. These compute partitions are open to all researchers at SEAS and their allocation is governed by the relative fairshare of the groups. The partitions themselves are broken down into seas_compute for cpu-only nodes and seas_gpu for gpu nodes:

  • seas_compute:
    • Cores: 5584 cores of compute ranging from Intel Cascade Lake to Intel Sapphire Rapids.
    • Time limit: 3 day time limit.
  • seas_gpu: 
    • Cores:  of GPU’s contains 3904 cores of compute ranging from Intel Ice Lake to AMD Genoa.
    • GPUs: 244 gpus ranging from Nvidia A100 to Nvidia H200.
    • Time limit: 2 day time limit.
    • Interactive jobs: limited to less than 6 hours and no more than 2 cores.

seas_compute and seas_gpu are mosaic partitions, meaning they have a variety of hardware and interconnects. For users requiring specific types of hardware please use the --constraint option in Slurm. A full list of constraints can be found on the Running Jobs page. To get specific gpu models see the GPU section of the Running Jobs page. For more information about Slurm partitions on the FAS RC cluster, please refer to the Running Jobs document.

Note: SEAS partitions are restricted to SEAS and requires membership in the seas group when logged into the FASRC cluster. You can view your groups using the id command:

[jharvard@rclogin ~]$ id
uid=12345(jharvard) gid=99999(harvard_lab) groups=34540(cluster_users_2),34739(seas)

If you are sponsored by a faculty member listed on the SEAS Faculty page but do not have seas group membership please create a ticket by sending an email to rchelp@rc.fas.harvard.edu.

For researchers needing a secure environment, the FAS Secure Environment (FASSE) is a secure multi-tenant cluster environment to provide Harvard researchers access to a secure enclave for analysis of sensitive datasets with DUA‘s and IRB’s classified as Level 3.  Please see the FASSE cluster documentation for how to gain access. Note that a home folder on FASSE is separate from any home folder you might have on the FASRC (Cannon) cluster. Data from the secure level 3 (FASSE) environment should not be transferred into level 2 space (Cannon).